Altered Book by Hels Sheridan

CRAFT SWAP FORUM

ALTERED ART PROJECT

BY

HELS SHERIDAN

Altered Art is becoming more and more popular and there is no end to the possibilities of altering ordinary, every day items, making them into little works of art. For this project I have altered a children’s board book.

Ingredients:

Ingredients 1Ingredients 2Ingredients - SealAltered Book - Front Cover

  • Board book
  • Bind It All Machine & Wire
  • Maison Papers
  • Slide Mounts
  • Tags/Mini Envelope
  • Rubber stamps
  • Chipboard
  • Plain cream cardstock
  • Grungeboard
  • Brads
  • Fragments
  • Charms
  • Wax Seals
  • Distress Inks
  • Adirondack Acrylic Dabbers
  • DS Tape/Scissors/Silicone glue
  • Sandpaper Paper
  • Distresser

I started by tearing all the coloured laminated covering from all the pages, leaving me with plain grey chipboard. I took some Adirondack Acrylic Dabbers and some Crackle Paints and painted parts of each page.

Once the paints had dried completely, I used my finger to smudge Gold Dabber over the painted parts of the page.

Painting - part 1Painting - part 2Painting - the gold

I used papers from the Maison Range by K & Co. To make the papers look more worn and old, I used Cut & Dry foam to smudge Walnut Stain Distress Ink on the edges. I also used a paper distresser and sandpaper to grunge up the edges of the papers and the book. I took care to tear the papers so that the painted parts of the pages were on show.

Distressing Part 1Distressing Part 1Distressing Part 2

Once I had decorated all the pages, I began to build up the design of each page using a selection of rubber stamps, embellishments, chipboard and Grungeboard.

Grungeboard and Chipboard

The stamps that I have used in this project are from a range of manufacturers, namely;

The Stamp Connection/Artistic Stamper – Pgs 1, 2, 3, 5, 6, 8, 10

Invoke Arts – Front Cover, Pgs 1, 2, 4

Stampers Anonymous, Tim Holtz Collection – Pgs 4, 6, 8

Crafty Individuals – Pgs 7, 9, 10, 11, 12

Paper Artsy – Pg 9

Stamps Away – Alphabet

Catslife Press – Pgs 6, 8, 12 & Back Cover

Lost Coast Designs – Pg 12 (inside envelope)

Stampendous – Pg 1

I hope that you have enjoyed looking at this project and you will have a go at altering things for yourself.

Hels x

Here is the book:

Cover

Pages 1 and 2

Pages 3 and 4


Page 6 Open

Pages 9 and 10

Page 9 - File Folder

Pages 11 and 12

Page 12 - Envelope Contents

Back Cover

How to do the Bird

Bind It All Page

Published in: on March 16, 2008 at 12:02 am  Comments (9)  
Tags: , , , , , , ,

What is Altered Art?

Altered art is simply taking an object and, by use of various creative techniques, transforming the look and / or purpose of it.

You can alter anything! I know lots of people transform aluminium cans or dominoes or their heat guns. But you are really only limited to your imagination and then things you can lay your hands on.

There are no rules – other than to enjoy yourself. You can use near enough any product – as long as it is suitable for your chosen surface – and any technique.

If you are looking for products that are ideal for altered art – Ranger is the company to seek out first.

  • Alcohol Inks
  • Crackle Paint
  • Acrylic Dabbers
  • Distress Inks

For anyone who knows Tim Holtz, you are probably well aware of these products already. Alcohol inks (now only available in the UK in individual colours) are fantastic, transparent inks that dry onto all surfaces and can be blending to create amazing results. The Crackle Paint is the newest addition to the Ranger range – and is a simple one-step paint that dries to a cracked finish – the thicker you apply it, the bigger the effect. The colours of the paint match those in the Distress Inks. There are amazingly versatile. You can stamp with them or use them in a range of direct-to-surface techniques. They blend well, react to water in interesting ways and are, perhaps, the most useful ink pad you can add to your collection. (Oh yes, there is a range of matching embossing powders!!)

Acrylic dabbers are great for applying colour to your surface – the range has vibrant as well as more muted tones. In theory you can apply these without getting messy – but I don’t know anyone who doesn’t end up with paint somewhere unexpected!

Another product you might want to consider are Luminarte Radiant Rain Dabbers – these are wonderfully vibrant colours that will go onto a range of surfaces. And of course, where would many people be without Glimmer Mists? These are a glittery ink that you spray on. Loads of colours and very addictive….

I would say that a Cropadile is an essential for altering stuff – you can punch holes to add brads or ribbons or just for decoration. Sandpaper or a sanding block is also very useful for creating great texture and distressed effects.

But you can use anything – papers, stamps, ink pads, embossing powders, glitters, paper flowers and other embellishments – all the things you have in your stash.

The only limit you really have is time!


Why not post a comment with a link to things you have altered? There is much inspiration to be had from blog surfing!

Published in: on March 16, 2008 at 12:02 am  Leave a Comment  
Tags: , , , ,

Product Review – Paper Artsy Stamps

I was lucky enough to be sent a pile of the new stamps from the ‘Squiggly Ink‘ range by Paper Artsy (thanks Leandra!). They are available as plain rubber or prestuck to EZ-Mount (saves a lot of hassle) and there are a huge variety of fun doodly/swirly designs.

I have done a couple of projects with them – and I have to say that the quality (as ever with Paper Artsy) is fantastic. Having them premounted on EZ-Mount meant that I was stamping straight away. I tried them with Staz-on, Chalk and Dye inks and they all worked really well. Clean-up was also easy.

They come adhered to a laminated sheet – which protects them well and easy to find when you are rummaging.

Anyway, here are the things that I have made (apologies to my Secret Valentine – but I used them to decorate your card – so I guess that the surprise is spoiled now)

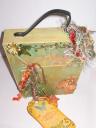
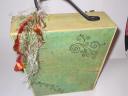
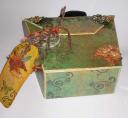
Firstly I did this altered handbag – probably my biggest single project to date!

The handbag is part of the Bare Essentials range from Creative Imaginations and is a good smooth surface on which to work. I traced round the basic shape onto some of the gorgeous new Mira papers from K&Co. Some people have said that they thought they might be a bit too bright. Once you get them home, they are wonderful – zingy and fresh but not in-your-face – if you know what I mean.

Having cut out the papers, I then attacked with my new Paper Artsy Stamps. It was easy to get the design working as they all co-ordinated well.

Then can for the fun part. I inked and dabbered the edges of the handbag. I distressed the edges of my papers using the Tim Holtz tool. I painted the top of the handbag using various Tim Holtz paints – both the dabbers and the new crackle paint (it was easier than trying to fit paper round the handles).

Using mod podge I adhered the papers to the sides of the bag and allowed to dry.

Then I started in with more distress inks and lots of glimmer mists (sugar cookie and gingerbread). I just kept going until I got the effect I wanted.

I finished the look with various fibres from my collection, a tag from the Mira collection (which I decorated front and back with more stamping and glimmer mists).

I took some of my Prima flowers and stamped (using staz-on) over them to tie into the design. More glue held these in place. A couple more squirts of glimmer mists tied them into the overall feel.

I am rather pleased with the result – not bad for a £2.99 pick-up at a Hobbycraft sale.

handbag-1.jpghandbag-4.jpg

handbag-2.jpg

handbag-3.jpghandbag-5.jpg

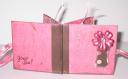
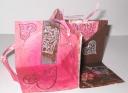
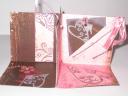
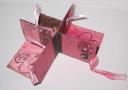
For the Valentine card, I took 3 different double sided papers from a Bo Bunny Parisian Romance range (I think they came from one of the CSF supporter sites – but I can’t remember which… oops too many papers) and cut them into 5.75in squares. Using a paper folding technique, I scored them into quarters and then scored two adjacent corners along the diagonal so that I could fold one part up into a tag pocket and the other would allow the card to fold flat (I think you should work it out from the pictures!)

I then cut 3 small tags from the papers and got to work with my stamps.

I used a range of Brilliance inks this time alongside a Purple Versafine – co-ordinating the colours to the papers. I used the occasional blast of glimmer mist and edged the papers and tags using Brilliance inks.

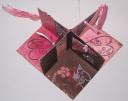
Once everything was dry, I assembled it into a mini pop-up tag card. I used lots of DST to hold the three pages together and then stuck some ribbon to the outside to form the closure.

Using one of the papers, I cut covers to hide all the workings. These were edged in a burgundy ink and glued into place – leaving the ribbon free to be tied. I also covered the joint with another strip of paper – to create a more book-like look. A couple more blasts of Black Cherry Glimmer Mist and my task was complete.

It was great fun to work with and I have another one in progress just because!

valentine-2.jpgvalentine-1.jpg

valentine-3.jpgvalentine-5.jpgvalentine-4.jpg

The stamps do work brilliantly for a whole range of themes – doodles and swirls are still a massize part of the design inspiration in crafting at the moment (a lot more so than Oriental IMHO).

I cannot recommend them highly enough – and a big thanks to Leandra for supplying me with them to play with.

You can get them direct from her at www.paperartsy.co.uk

Published in: on March 1, 2008 at 11:57 pm  Comments (4)  
Tags: , , , , , , ,